
 Turing Machines were invented by Alan Turing before the first computers were created as a model of computation. It strips the idea of what computation is down to a very simple idea of a machine.
Here are ideas and resources for teaching Turing Machines. See also the teach computing ISAAC Resources for a more traditional description and resources linked to specific exam boards.
Above is the edited video of Paul Curzon’s talk given on 13 May 2020 to Teachers as part of the Lockdown Lectures series.
The Chocolate Turing Machine
Make working Turing Machines out of chocolate (symbols after all can be anything). There is no reason why a computer shouldn’t taste nice too.
Read the original cs4fn article in issue 14 or download just the article here
Talks/Slides about Turing Machines
The following are slides for a slightly different version of the talk from the video above (for school students) given in April 2021 for the Greek Computing at School Festival
- The Chocolate Turing Machine (Greece April 2021) [.pdf] (large file)
- Live Stream/Recording (with Greek translation)
- Some of the students’ chocolate Turing machines
- Paul’s slides for ‘A Chocolate Turing Machine’ translated into Greek: Μία Μηχανή Turing (Τούρινγκ) από Σοκολάτα
- Paul’s slides in a blog post by another CS teacher (in order to implement the workshop in his own classroom)
The following are the slides delivered at the CAS London Conference Feb 2020
- The Chocolate Turing Machine (CAS London 2020) [.key] [.pdf]
- The Chocolate Turing Machine [ppt]
Resources Pack for Building a Chocolate Turing Machine
Sadly you will have to supply your own chocolate (and chocolate factory) as I haven’t found a way to provide downloadable chocolate (sorry)
Sample Instruction Tables can be found in the above slides.
Of course it doesn’t have to be chocolate – anything can be used as symbols and state values (eg why not use Lego or similar instead).
Some Simple Turing Machine Programming Challenges
Can you create Turing Machines to do the following (pick ones that sound interesting to you). In each case below test your Turing Machine thoroughly to ensure it always works. These machines need different symbols, different (sometimes lots of) states and different instruction tables.
1. Work out the instruction table for a Turing Machine to add 2 to a unary number.
-
- Assume that the HEAD initially points to the left-most symbol of the number.
2. Work out the instruction table for a Turing Machine to add 2 to a unary number
-
- Assume that the HEAD initially points to the left-most symbol of the number.
- The HEAD must end pointing to the left-most symbol of the number.
3. Work out the instruction table for a Turing Machine to add 2 to a unary number
-
- Assume that the HEAD initially points to the left-most symbol of the number.
- The HEAD must end pointing to the left-most symbol of the number.
- The number must start at the same point on the tape as it did originally
4. Work out the instruction table for a Turing Machine to double a binary number
-
- You can use three symbols (0,1 and BLANK)
- Assume that the HEAD initially points to the left-most symbol of the number.
5. Work out the instruction table for a Turing Machine to double a binary number
-
- You can use three symbols (0,1 and BLANK)
- Assume that the HEAD initially points to the left-most symbol of the number.
- The HEAD must end pointing to the left-most symbol of the number.
- The number must start at the same point on the tape as it did originally
6. Work out the instruction table for a Turing Machine to control a simple red-green traffic light.
- Two locations on the tape should be allocated to control the lights – one location red, one green. Assume as they change symbol the light each is linked to changes accordingly.
- Symbols on the tape include blank, red-on, red-off, green-on, green-off.
- States include STOP and GO.
7. Work out the instruction table for a Turing Machine to encrypt messages using a simple substitution cipher.
- A substitution cipher swaps each letter in the message for a new symbol.
- The initial tape should hold a word to encrypt (scramble).
- The final tape should contain an encrypted version of the word.
- Assume messages are written in Martian. The Martian alphabet only has 5 letters: A,E,R,S and T.
- To encrypt a letter swap it with the next in the Martian alphabet so A becomes E, E becomes R, R becomes S, S becomes T, and T becomes A.
- Symbols include BLANK, A, E, R, S and T.
- States include ENCRYPT and STOP.
- The HEAD should start pointing to the first letter of the word on the tape.
EXTENSIONS:
- Extend the Turing Machine to encrypt words using any letter of the alphabet.
- Return the HEAD back to the start of the message.
- Extend the Turing Machine to be able to encrypt whole words including sentences.
8. Create a Turing Machine to decrypt messages that were encrypted using the above substitution cipher.
- The initial tape should hold an encrypted (scrambled).
- The final tape should hold the original message.
9. Create a Turing Machine to count in a simple numeral system such as Roman numerals or Ancient Egyptian numerals.
10. Create a Turing Machine to multiply a decimal number by 10.
11. Create a Turing machine to count in decimal.
12. Create a Turing Machine that gives the number of days in a given month.
- The initial tape has the name of a month
- The final tape has the number of days of that month added on the end (assume 28 days in February)
Role Playing a Turing Machine
Another way to illustrate a Turing Machine and explain the concepts is by having students act out a role playing version,
Have a series of students act as the infinite tape. They stand in a line holding cards with symbols on, initially all BLANK (or use a specific symbol for this). Strictly, you need an infinite line of students. Despite rising class sizes most schools will not manage this so explain to the class that they have to imagine this (and more students can always be added infinitely as needed.
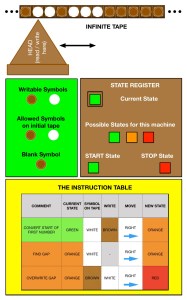
A further person acts as the State Register recording the current state. They hold a coloured card. Initially, this is the start state (for my Turing Machines, I use GREEN as the start state.)
Use a hat for the Tape Head. Place it on the head of the person in the tape who is in the initial position.
Show the instruction table as a slide.
Set up the initial tape by replacing some blanks for symbol cards (eg 1).
Now run the Turing Machine, by finding the row in the Instruction Table that matches the state register colour and symbol on the tape under the tape head (hat). Change the symbol, move the head (hat) and change the state accordingly.
Keep doing this until you hit a stop state (which will have no corresponding rows in the table.
As you step through the program, explain what is happening, and how the Turing Machine is working. Encourage students to ask questions.
A good follow up activity is to let groups of students now dry run Turing Machines themselves (either on paper or as chocolate machines). This will aid understanding and help uncover misunderstandings. They can then write their own to do simple tasks.
A short story about Turing Machines
More to Come.
Brought to you by cs4fn, Queen Mary University of London, with funding from the Institute of Coding, CAS London and the NCCE/Isaac Computing
![]()
