
Bridget Riley is an influential artist important for her abstract art that explores visual perception. She uses simple lines and shapes to create illusions of form and movement. Combine learning about her work and Op Art (optical art) with learning to program and learning about digital images.
There are several computing topics you can explore while exploring Riley’s art including:
- vector graphics
- sequences
- procedures
- arguments
- decomposition
- abstraction
- computer and interactive art
Many artists are inspired and influenced by those who came before them. For example, early in her career, Riley was inspired by Seurat’s pointillism images. She created her own works based on his, before moving on to more abstract images. You can start out creating images inspired by Riley, though with a computer twist (if you learn to program).
Instructions and Programs
Many programming tutorials start with drawing simple shapes, so why not be more adventurous and create Riley inspired art rather than just drawing squares and circles.
Many of her works involve simple black shapes like circles and rectangles. Given an instruction to place a shape at a given position and with a given size. For example, here work White Disk 1 is just a series of black circles of different sizes placed at different positions on the canvas.
Here is my picture “cs4fn White Disks inspired by White Disk 1 of Bridget Riley”. Is it a bunch of black disks or 4 white disks? Instructions to create it are below.
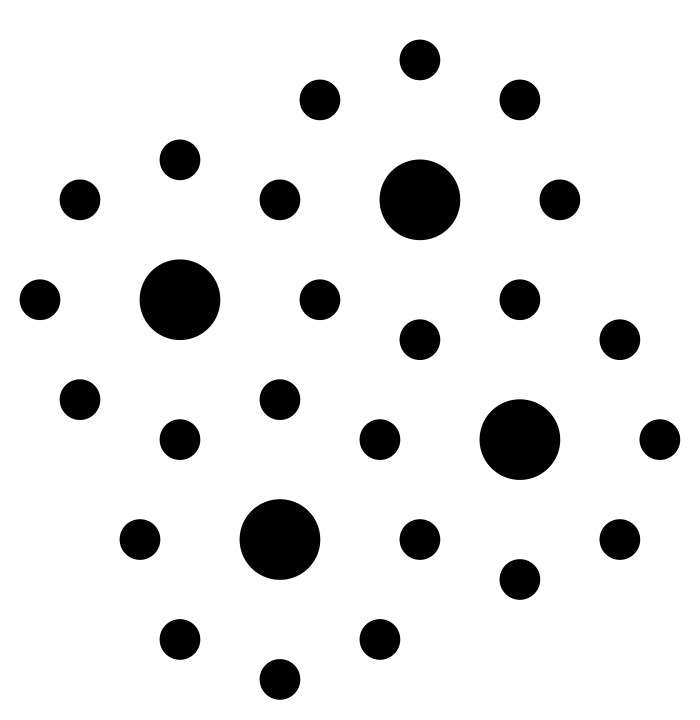
By following the sequence of instructions below you can recreate my picture yourself. For this to work the instructions must have very precise meanings, and you must know what they mean. You must be able to follow them precisely, just as a computer follows the instructions in its program precisely, if you are to recreate my picture. The meaning of an instruction is called its semantics.
Bounding Boxes
My “Draw” instructions (for you to follow) tell you precisely what to draw if you know their meaning. An example is
- Draw(Circle, Black, 24, 20, 4, 4)
The values in the brackets (Circle, Black, 24, 20, 4, 4) tell you the shape to draw, the colour to fill it in, its position as two numbers and its size (two further numbers). The numbers refer to what is called a bounding box – an invisible box that surrounds the shape. You draw the biggest shape that fits in the box. All measurements are in cm.
In my language, the position numbers tell you where the top left corner of the bounding box is. The first number is the distance to go along the top of the page from the top left corner. The second number is the distance to go down from that point. The top left corner of the bounding box in the above instruction is 24cm along the page and 20cm down.
The final two numbers give the size of the bounding box. The first number is its width. The second number is its height. For a rectangle, if the two numbers are the same it means draw a square. If they are different it will be a rectangle (a squashed square!) For a circle if the two numbers are the same then you have a perfect circle. If they are different then it means a squashed circle. The bounding box of the above instruction is a square 4cm by 4cm. It therefore contains a circle of diameter 4cm.
Sequences
The instructions are in a sequence. You must draw the shapes in the order given. Have a go at following the instructions, drawing your own version of this on squared paper. Draw the bounding boxes in pencil first, then fill in the shapes and finally rub out the bounding boxes.
1.  Draw(Circle, Black, 24, 20, 4, 4)
2.  Draw(Circle, Black, 19, 8, 4, 4)
3.  Draw(Circle, Black, 12, 25, 4, 4)
4.  Draw(Circle, Black, 7, 13, 4, 4)
5.  Draw(Circle, Black, 20, 2, 2, 2)
6.  Draw(Circle, Black, 15, 4, 2, 2)
7.  Draw(Circle, Black, 25, 4, 2, 2)
8.  Draw(Circle, Black, 8, 7, 2, 2)
9.  Draw(Circle, Black, 3, 9, 2, 2)
10. Draw(Circle, Black, 13, 9, 2, 2)
11. Draw(Circle, Black, 27, 9, 2, 2)
12. Draw(Circle, Black, 1, 14, 2, 2)
13. Draw(Circle, Black, 15, 14, 2, 2)
14. Draw(Circle, Black, 25, 14, 2, 2)
15. Draw(Circle, Black, 20, 16, 2, 2)
16. Draw(Circle, Black, 30, 16, 2, 2)
17. Draw(Circle, Black, 3, 19, 2, 2)
18. Draw(Circle, Black, 13, 19, 2, 2)
19. Draw(Circle, Black, 8, 21, 2, 2)
20. Draw(Circle, Black, 18, 21, 2, 2)
21. Draw(Circle, Black, 32, 21, 2, 2)
22. Draw(Circle, Black, 6, 26, 2, 2)
23. Draw(Circle, Black, 20, 26, 2, 2)
24. Draw(Circle, Black, 30, 26, 2, 2)
25. Draw(Circle, Black, 25, 28, 2, 2)
26. Draw(Circle, Black, 8, 31, 2, 2)
27. Draw(Circle, Black, 18, 31, 2, 2)
18. Draw(Circle, Black, 13, 33, 2, 2)
Now create your own picture, writing the instructions so others can recreate it by following your instructions.
More vector dot-to-dot puzzles
![]()
![]()
